How to Use Photoshop
paaaa
There are several tutorials available online which are very useful
for a beginner. They require little knowledge even if the person has to
start from scratch. They are expected to learn the section of how to
Start, then later progress through the next section. The first tool to
learn is the Crop tool where the user uses the tool to trim down the
images. The Crop tool is also used to increase the canvas size and to
rotate the image. When a person is learning how to use Photoshop, a tool
called Curves is a very useful tool for colour correction and tones
adjusting functions in an image.
 A Brush tool comes in handy when shaping, sizing, adjusting,
texturing and colour application. When a person is using digital images
they require a Pixels tool, which is useful in understanding
resolutions. This is because a digital image is made of pixels, which
are small squares with colour value of information that is digital.
Retouching tool is a very powerful tool used in image cleaning, lifting
the images face and repairing sections of an image. Blur filters are
normally used in creating a zoom or a motion. It usually replicates
effects and creates softness using a lens, which is out focused.
Beginners do not usually use colour setting application whwn learning
how to use Photoshop, but it is extremely important in the course of
learning, as it is very essential in producing consistent and quality
images.
Text and text effects is a tool used to give tremendous scope to creative graphics. The effects maybe put in form of texts and all kinds of techniques may be applied especially where there is justification of texts. Filters provide subtle improvement and graphic effect. A powerful facility called hue and saturation is used in making large shifts on colours. It adjusts individual colours or whole images colours and it can also tone white and black images. A person could also convert a coloured image to white and black using black and white via greyscale option. This gives a poor quality image, as a good quality conversion of an image requires more work. Using these easy-to-follow steps, a person may learn how to use Photoshop in a short period of time before they can graduate to advanced levels.
The other blending modes and quick tips helps the learner to control the image’s reactions to the adjacent layers. The blending creates more impact when two images are brought together. In case the person makes a mistake or if they change their minds about something in the image, they can scroll back to past actions using the history brush. Resizing and capturing the image may produce some softness degree in the pixel. For a person to sharpen the image, they need a Sharpening tool. The image may appear like it has little details in shadows and highlights.
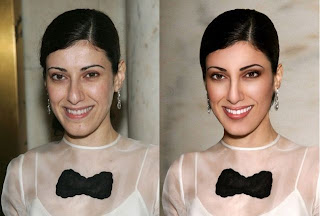
For a person to recover these details, they need to use the bring out details tool. A Photoshop needs to be in shape whether simple or creative design and to achieve this a person needs to use a making photoshop shapes tools. A Photoshop may be used in popping pimples and changing facial expression after the image has been taken. It may take sometime for person to learn how to use Photoshop to alter a photo. There are several techniques, which one may use to change a captured photo into reality. Pop pimples is the software used to eliminate blemishes and pimples from the face. The application is used to remove spots and stains captured in the photo.
The picture of Photoshop:
 | ||
| Before and after |
-
-
1
Begin by choosing what area of Photoshop you would like to work in. Organize your images by date, event, or whatever you decide. Create items with your images such as cards or calendars. Share your images by email or upload them to a website. The Edit option is probably the most used option by the digital photographer and allows you to change your images in a variety of ways.
-
2
Choose edit. In the edit option you can choose Quick Edit (for simple changes like cropping), Guided Edit (get a walk-through), or full edit (all the editing items you need). For the purposes of this article choose full edit.
-
Sponsored Links
- SSL
Certificates - thawteChoose from a complete range of certificates with the strongest SSLwww.thawte.com
- SSL
Certificates - thawte
-
3
Click File then Open in the Photoshop edit screen to open an image in your documents to work on.
-
4
Use the options across the top of the edit screen to do such things as open, save and resize images, convert to black and white, adjust lighting and color, create layers and use filters.
-
5
Check out the toolbar on the left of your edit screen in Photoshop (this toolbar can be moved if you like). Use these tools to zoom in or out, take out redeye, erase or clone items in an image, or add text or clipart.
-
6
Use the Photoshop effects or layers on the right of the edit screen (this section can be collapsed if needed). Effects can add enhancements such as shadows or filters to an image such as turning a digital photographers image into a watercolor.
-
7
Look for the bin at the bottom of the Photoshop edit screen to switch back and forth between images or move a layer from one image to another.
-
8
Practice on images after making sure you have saved the original and use the Adobe Photoshop help.
-
1
You can download photoshop in this website:
http://en.softonic.com/s/photoshop
You can watch the video of Photoshop cs6 for beginners:
http://www.youtube.com/watch?v=fzQTpxQulro
--------------------------------------Thank you------------------------------------
 Home
Home
Tidak ada komentar:
Posting Komentar